High end Smartphone native camera include wide(24mm 1x), Ultra Wide(14mm 0.6x), Telephoto(70mm 3x) and Macro. Each of them connect to independent CMOS. We will need the conversion lens to setup on the main camera. The Purpose of Main Camera is to leverage the sensor’s ability to capture ultra-sharp images and improve low-light performance. The CMOS size of the Main Camera is always the biggest.
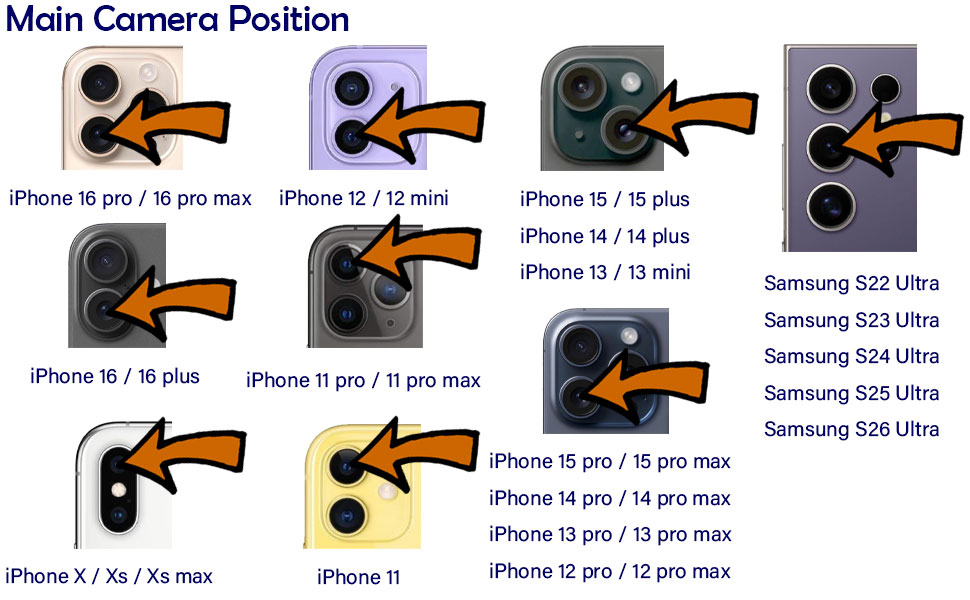
Where is the Main Camera?
You can find the Main camera on simple testing.
- Turn on the Main camera and choose the Magnifuication at 1X.
- Cover the camers by your finger in turn.
- At the same time, notice the screen when it become dark as main camera is covered by finger
Or Main Camera for some model is listed as below.
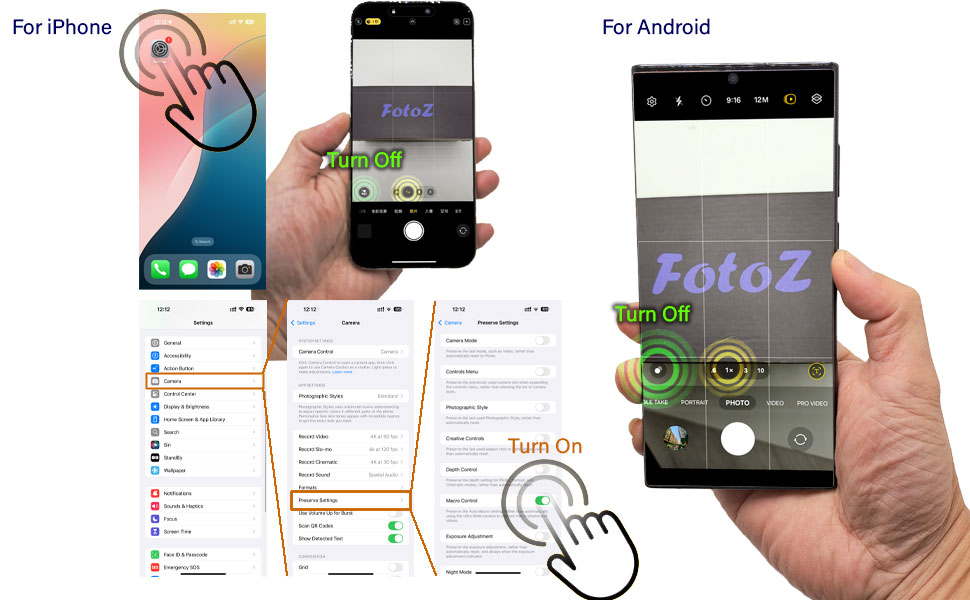
Prevent the Swap
After setup the Lens on the Main camera. When you start to shoot on Native Camera App, it start to Swap away. You should do the following setup to prevet this happen.
Third Party Camera App
Compare the performance of Native Camera App and Third-party Camera App. The Native app’s strengths are speed and computational photography (Deep Fusion, Smart HDR), while third-party apps offer manual controls (RAW, Focus, Exposure). The “better” choice depends entirely on your photography goals and skill level. Here’s a detailed comparison:
📱 iPhone Native Camera App: Pros
- Optimized Computational Photography
- Uses Apple’s Deep Fusion, Smart HDR, Photonic Engine, and Night Mode seamlessly.
- Best for quick, consistent results in tricky lighting (backlit scenes, low light).
- Speed & Reliability
- Launches instantly, focuses faster, and rarely crashes.
- Ideal for capturing fleeting moments (kids, pets, street photography).
- Portrait Mode & LiDAR Magic
- Advanced depth mapping and subject detection (e.g., pets, objects).
- Automatically applies studio lighting effects.
- Seamless Integration
- Photos sync instantly to iCloud, edits non-destructively in Photos app.
⚠️ Native App: Cons
- Limited Manual Control: No ISO/shutter speed adjustments, focus peaking, or histogram.
- Aggressive Processing: Sometimes oversharpens or oversaturates images.
- No RAW Support: Shoots HEIC/JPEG only (lossy compression).
- Forced Lens Switching: Auto-macro/ultrawide can’t be fully disabled.
📲 Third-Party Apps (Halide, ProCamera, etc.): Pros
- Manual Controls
- Full ISO, shutter speed, focus, and white balance adjustments.
- Histograms, focus peaking, zebra stripes for exposure.
- True RAW Capture
- 12-bit DNG files retain far more data for professional editing.
- Lens Control
- Lock specific lenses (prevents auto-switching).
- Advanced Features
- Long-exposure modes, focus bracketing, custom profiles.
- Log video profiles (e.g., in FiLMiC Pro).
⚠️ Third-Party Apps: Cons
- Slower Workflow: Launch time and focus speed lag behind native.
- No Full Computational Magic:
- Weaker HDR/night mode vs. Apple’s multi-frame processing.
- Portrait mode often less accurate (except Halide’s enhanced depth).
- Steeper Learning Curve: Requires photography knowledge.
- Cost: Most pro apps are paid (e.g., Halide $12/year).
Some suggested Third-party App
iPhone
Scenario
Everyday photos, social media
Low-light/high-contrast scenes
Professional editing/RAW work
Manual control (e.g., astro)
Video with log profiles
Recommendation
Native App
Native App
Halide or ProCamera
Native App
FiLMiC Pro
HALIDE MARK II

PRO CAMERA
FILMIC PRO

Android
Scenario
Point-and-shoot simplicity
Social media snaps
Manual control/RAW photography
Video with log/LUT support
Astrophotography
Recommendation
Native App
Native App
ProShot or Open Camera
FiLMiC Pro
ProShot
ProShot
Open Camera
FILMIC PRO